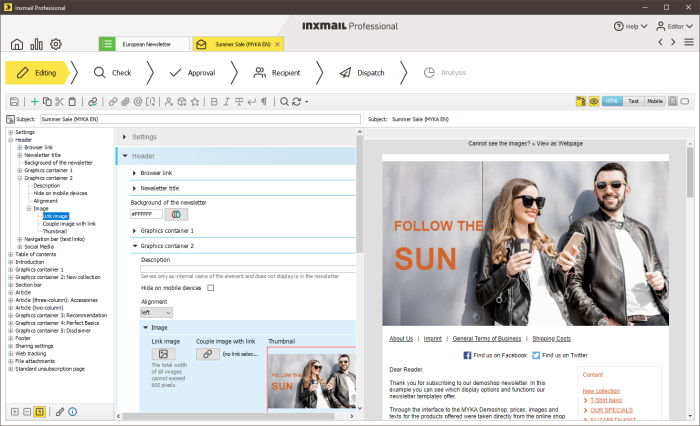
Overview: Editing area
The editing area (![]() Editing workflow step) is displayed as soon as you have created and opened a mailing.
Editing workflow step) is displayed as soon as you have created and opened a mailing.
The appearance of the editing area differs depending on which mailing format you selected and whether the mailing is based on a newsletter template.
- Editing area: Template Editor (newsletter templates)
- Editing area: Multipart mailings
- Editing area: HTML mailings
- Editing area: Text mailings
This will determine which buttons are displayed in the editing area:
|
Button |
Description |
|---|---|
|
|
Saves all changes |
|
|
Calls up the dialog box for inserting text from a file (unformatted) (Not displayed for mailings that were created based on newsletter templates.) |
|
|
Calls up the dialog box for editing the current selection (for example, the link dialog box if a link is selected) (Not displayed for mailings that were created based on newsletter templates.) |
|
|
Undoes the last change made to the mailing content (Not displayed for mailings that were created based on newsletter templates.) |
|
|
Restores the last change that was made to the mailing content (and then undone) (Not displayed for mailings that were created based on newsletter templates.) |
|
|
Calls up the dialog box for adding a new element (Only displayed for mailings that were created based on newsletter templates.) |
|
|
Copies the currently selected object |
|
|
Cuts the currently selected object |
|
|
Pastes the previously copied object |
|
|
Opens Link Management to check all the links inserted into your mailing (Performing a link test in Link Management) |
|
|
Opens the dialog box for inserting a new link (Inserting a link) |
|
|
Opens the dialog box for inserting an image as a reference (Inserting an image as a reference (linking an image)) (Not for text mailings) |
|
|
Calls up the dialog box for embedding an image in the mailing. (The button can be accessed via the (Not for text mailings) |
|
|
Opens the dialog box for attaching a file (Adding file attachments) |
|
|
Opens the dialog box for inserting a mailto link (Inserting mailto links) |
|
|
Drop-down list, for example:
|
|
|
Drop-down list for inserting recipient table columns; personalised text is selected for each recipient (Creating personalised texts) |
|
|
Drop-down list for inserting modules (Inserting modules) |
|
|
Drop-down list for inserting symbols. (Only enabled if the UTF8 character set encoding is selected for the mailing list.) (Inserting symbols) |
|
|
Formats the selected text with the ‘bold’ font style (HTML tag <b></b>) (Not for text mailings) |
|
|
Formats the selected text with the ‘italic’ font style (HTML tag <i></i>) (Not for text mailings) |
|
|
Formats the selected text with the ‘strikethrough’ font style (HTML tag <s></s>) (Not for text mailings) |
|
|
Inserts a line break (HTML tag <br/>) (Not for text mailings) |
|
|
Inserts a new paragraph (HTML tag <p></p>) (Not for text mailings) |
|
|
Adjusts the line length to the width of the editor (Show word wrap) or does not adjust it (Hide word wrap) (Only for HTML and multipart mailings) |
|
|
Turns the form view on/off (Setting up a user template (text, HTML, multipart)) (Only for mailings that contain form fields) |
|
|
Calls up the dialog box to search for any chosen text in the editor |
|
|
Refreshes the quick preview if displayed ( |
|
|
Shows or hides the structure tree (positioned to the left of the mailing content) (Only displayed for mailings that were created based on newsletter templates.) |
|
|
Shows or hides the browser preview of the mailing (positioned to the right of the mailing content) |
|
HTML |
Opens the HTML preview |
|
TEXT |
Opens the text preview |
|
Mobile |
Opens the preview for how the mailing will appear on mobile devices
|
|
|
Generates a mailing preview in portrait format for mobile devices |
|
|
Generates a mailing preview in landscape format for mobile devices |
Related topics

