Step by step
To create a new user template, open the Create new user template dialog box as follows:
- To create a user template that is only to be available in a specific mailing list, click the tab of the mailing list >
 Templates agent > User templates tab. Then click the
  (Create new user template) button.
 -
To create a global user template that will be available in all your mailing lists, click the
 (Global settings) tab > Templates agent > User templates tab. Then click the (Create new user template) button.
A dialog box appears.

-
Enter a name for the user template in the dialog box.
-
Select one of the following formats for the user template:
-
HTML
User templates created in this format can be used to create HTML mailings.
-
Text
User templates created in this format can be used to create text mailings.
-
Multipart (HTML + Text)
User templates created in this format can be used to create text and HTML mailings.
-
Confirm the dialog box by clicking OK.
The new user template is opened in a tab.
-
In the
 Editing workflow step, click in the editor and create all content for the user template.
Template content is created in the same way as mailing content. You can also use texts, modules or placeholders, among other things.
- To define a form area in the user template, create corresponding form fields in the Editing workflow step.
-
Click the appropriate place in the editor and then select
 Form field in the
  Insert commands drop-down list.
A dialog box appears.
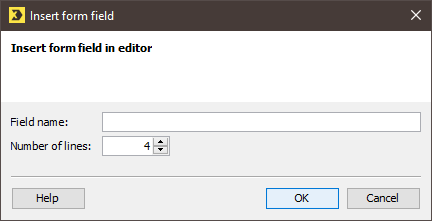
- Enter a field name in the dialog box (for example, maintext). Then enter the number of lines that the form field should contain (for example, ‘12’).
-
Confirm the dialog box by clicking OK.
The field function for the inserted form field is displayed in the editor (for example, [inx:replace("maintext",12)]).
You can format the title of the form field (for example, the title ‘Maintext’) using HTML code.
In HTML or multipart templates, you can turn the form view on by clicking the
 (Turn on form view) button (or turn the form view off by clicking the
  (Turn off form view) button).
If you would like to edit the inserted form field, then, with the form view turned off, select the form field and click the
 (Edit selection) button.
 -
Save your entries in the
Editing workflow step. -
In the
 Check workflow step, you can check your template content for selected test profiles or recipients.
 -
Close the tab of the user template.
-
You return to the tab of the mailing list or the
(Global settings) tab > Templates agent > User templates tab. The new user template is displayed in the table.
- You have created a user template that you can now use to create mailings.
Additional information
You can select an existing user template in the table and then:
- make a copy using the
 (Copy) and
  (Paste) buttons.
 - open the user template for editing by double-clicking it in the table.
- delete the user template using the
 (Delete user template) button
 - rename the user template using the (Rename user template) button.
Note that when you edit, delete or rename a user template, this will not affect mailings created with the user template before the template was modified.
Related topics
Inxmail Professional:
2 possible use cases
Depending on your contract, you might use Inxmail Professional in different ways:
-
As part of the Inxmail platform: You use newsletters & campaigns as your main tool for creating and sending newsletters. Inxmail Professional only serves as a recipient database and configuration tool in the background.
We are constantly expanding the functionality of “Newsletters & Campaigns”. Check out newsletters & campaigns section to find out if the feature you are looking for might already be available there.
-
Full scope: You use the legacy tool Inxmail Professional as your main tool for creating and sending newsletters.
Did you not find what you were looking for?
-
Send us your feedback.
