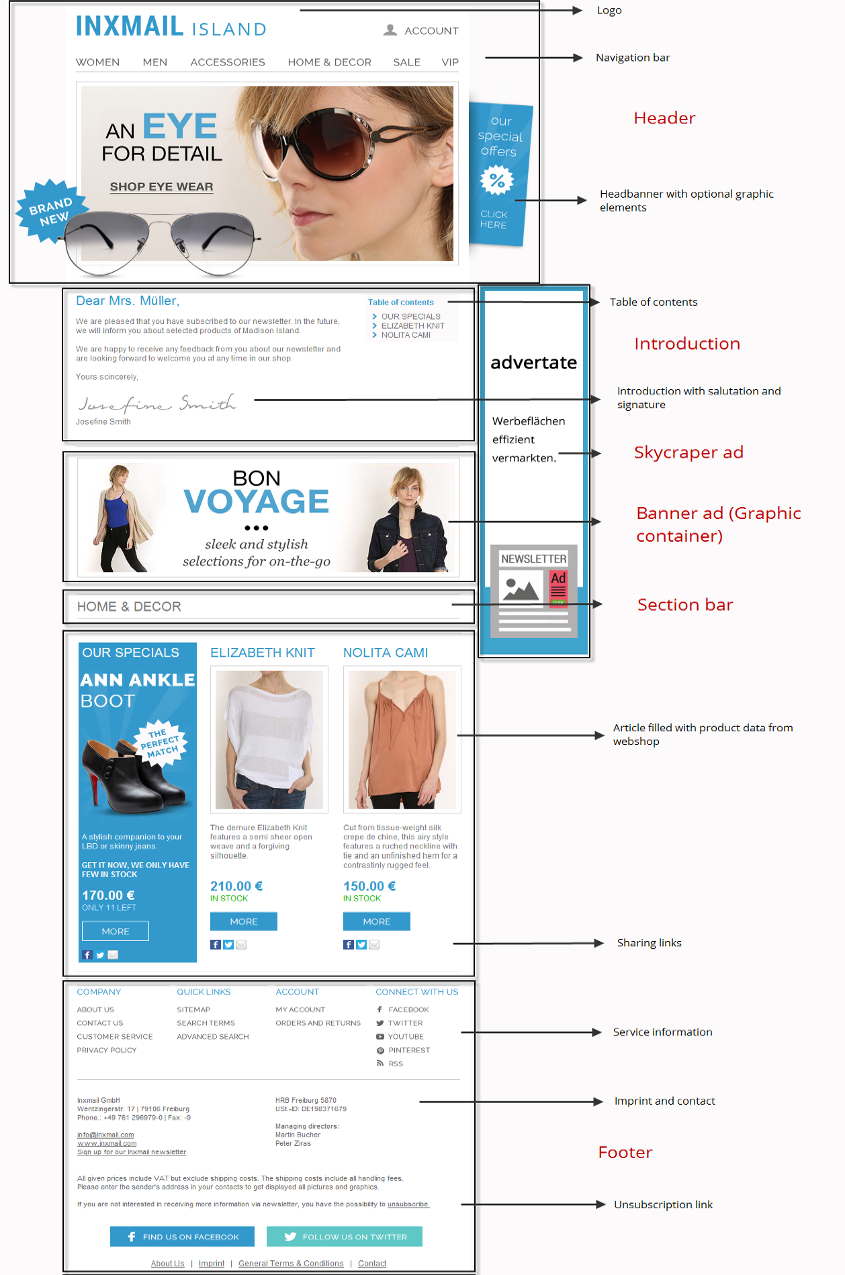
By default, the Advanced Template contains the following main elements:
‘Settings’ main element
You can use the Settings to adjust the colour and font of your newsletter and select suitable bullet points for further links or simple lists (Configuring settings). This is also where you specify your favicon for the browser view, and the link types for the browser link and tracking pixel.
‘Header’ main element
You can set up the browser link, logo and header in the Header. Optional banner elements can be placed next to the header graphic, for example. A navigation bar links to categories on the web page. Instead of the header graphic, a mobile teaser can be set up and displayed on mobile devices (Creating an advanced header).
You can use the Article (header) element for even more flexibility in the design of the header. The Article (header) element is a reduced version of the Article (single-column) module – without the Price, Button and Subheadline elements.
‘Introduction with table of contents’ main element
In the Welcome, you address the reader personally and briefly summarise the topics of the newsletter. In this way, you arouse interest. Set the colours and fonts, and insert a signature at the end of the introduction to give the newsletter a personal note.
The Table of contents can be set in a number of ways in the Advanced Template. It clearly lists the topics of the mailing. The individual categories can be hidden (Creating a right-aligned table of contents).
‘Article’ main element
The Article main element is where you store your mailing content with images and links. You can also integrate external content from your webshop, CMS, CRM or ERP system. Besides a simple article, you can also select the Article (two-column), Article (three-column) or Article (multi-column) main elements. This enables you to combine mailing contents and position them in different ways (Creating and editing articles).
‘Section bar’ main element
The Section bar is usually positioned above an article or image. It sorts the mailing contents by topic and offers the reader more structure in the mailing. Instead of a section bar containing purely text or text and an image, you can also insert the section bar as a linked image if, for example, you would like to draw attention to new products (Integrate section bar as image).
‘Graphics container’ and ‘Graphics container (mobile)’ main element
Graphics containers are used to store simple images, calls-to-action or advertising banners. Graphics containers also allow several images to be integrated via so-called slices and to be coupled with different links (Setting up a graphics container).
‘Footer’ main element
The Footer concludes the mailing and contains further service information, as well as the legal notice and contact address. Here you should also provide the reader with the option to unsubscribe from the newsletter.
‘Skyscraper ad’ main element
Use the Skyscraper ad main element to integrate advertising. The skyscraper is positioned at the right edge of the mailing and has a preset width of 160 px.
‘Sharing settings’ main element
You can set up social sharing links and then activate them for articles of your choice in the Sharing settings. The recipients of your newsletters can then use these further links to share article contents on social networks such as Xing, Twitter or Facebook, thereby increasing the distribution of your newsletter contents (Setting social sharing links for an article).
‘Web tracking’ main element
In the Web tracking main element, individual attributes per recipient or recipient group can be added to links. Linked service portals or web analytics tools will then automatically identify every recipient. This allows you to generate individual offers or product recommendations for every recipient.
‘File attachments’ main element
In the File attachments main element, you can attach additional files (for example, vouchers, images or videos) to the mailing. Try to keep the file size as small as possible. It is recommended that the file attachments be in PDF format. For each file attachment, you can also specify whether the file should be sent to all recipients or only to a specific target group.
‘Standard unsubscription page’ main element
You can set up an unsubscription page using the Standard unsubscription page main element. Insert a heading and a text in the fields provided. It is also possible to add a banner to the landing page.
Below is an example of a mailing and its components based on an Advanced Template: