Step by step
-
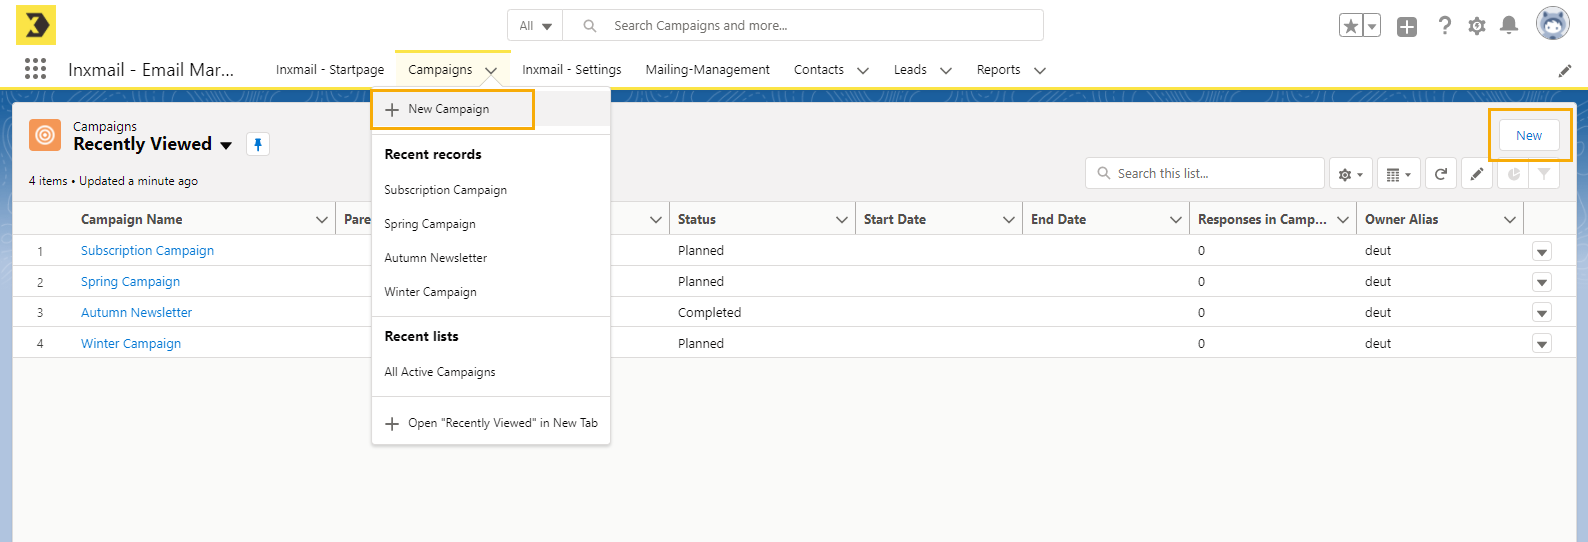
Click "New campaign" under "Campaigns" in the menu.
Alternatively, you can also press "New" in the campaign overview.
-
Select "Inxmail New Xperience: Email Campaign (Web)" and click "Next".
 All campaign types
-
Select "Inxmail New Xperience: Email Campaign (Web)" to send a single mailing and evaluate the click data.
-
Select "Inxmail Subscription Campaign" to manage subscriptions and unsubscriptions for recipients who regularly receive emails from you (newsletters, etc.).
Alternatively, you can also create an Inxmail Professional campaign. We however recommend working in Inxmail New Xperience since you will be able to set up your mailings faster and more easily there.
-
-
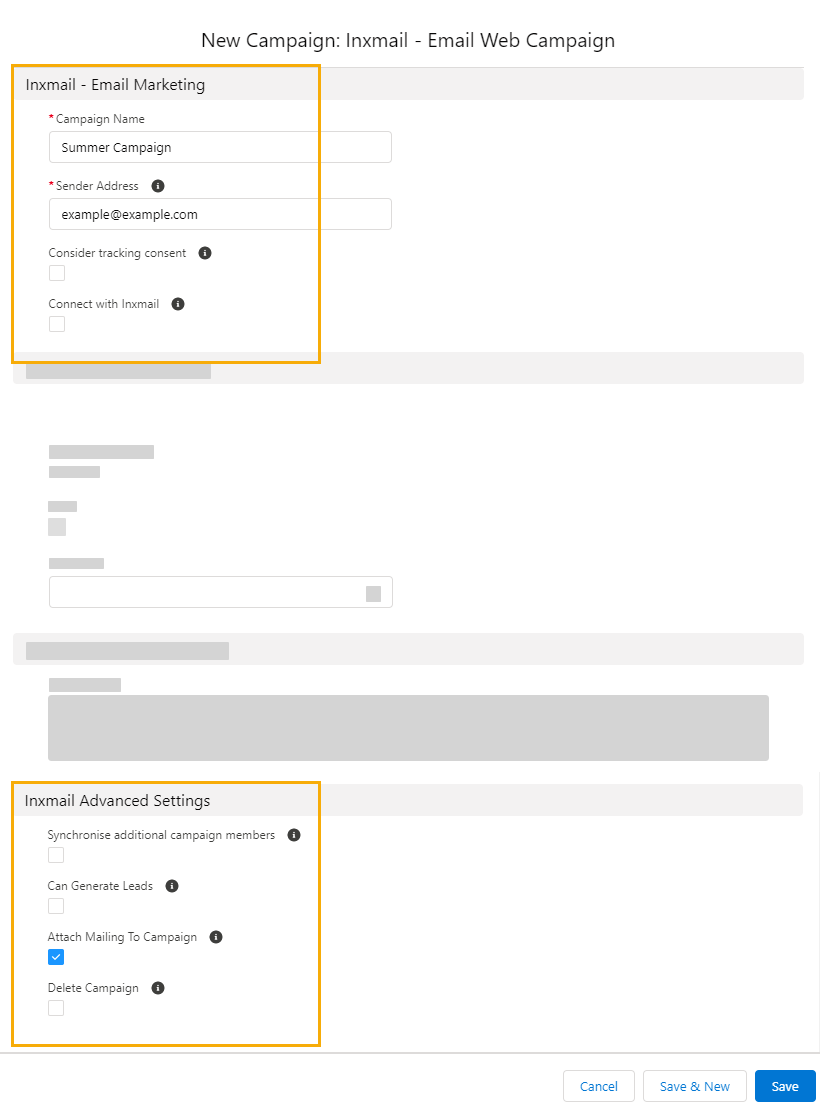
Enter a name for your campaign and define other settings for the campaign.
Campaign settings
The table below lists all Inxmail-specific campaign settings.
Field Description Inxmail Email Marketing
Sender address
The sender address is necessary to send a mailing. It is entered in Inxmail Professional as the sender address of the mailing list.
Include tracking permission
In this field, specify that personal data acquired via tracking in Inxmail be sent back to Salesforce. The setting relates to all recipients for the campaign.
If you activate this setting, the behavior of your recipients is tracked in an anonymized manner. You can then determine in Salesforce how many different recipients opened the mailing and which links they clicked, though you cannot establish the identity of a particular recipient.
If you disable this setting, person-based tracking is used to monitor the behavior of your recipients. You can then carry out analyses in Salesforce and determine which recipients opened the mailing and what links they clicked.
Note: The Include tracking permission data field in Salesforce controls the advanced property Include consent for person-based tracking in the Inxmail Professional mailing lists. Detailed information can be found in the Inxmail Professional online help in the section Mailing lists > Advanced properties.
Couple with Inxmail
You will first need to couple Salesforce with Inxmail before you can transfer your campaign data to Inxmail. Once you've ticked the Couple with Inxmail check box and saved your campaign, the Inxmail New Xperience integration establishes a connection to Inxmail.
We recommend that you first add members to your campaign before you couple it with Inxmail.
Further Inxmail settings
Synchronize additional campaign members
Tick this check box to automatically transfer new campaign members from Salesforce to Inxmail every two hours.
Campaign generates leads
Web-to-lead -
You can use a campaign specifically to acquire new customers. This is done by ticking the "Campaign generates leads" check box. All new subscriptions received (for example, via web form or API) are transferred from Inxmail to Salesforce. These new subscriptions are created as "lead objects" in Salesforce on the Leads tab.
-
Activate the "Synchronize all leads" checkbox in the Inxmail Connector settings to specify that a new lead should also be created for recipients who have already been stored with a Salesforce ID in Inxmail Professional (i.e. for whom a value has already been entered in the SFDCID column).
-
The specific information that is required must be entered when creating leads in Salesforce. Make sure that users are required to enter this information in your registration forms, for example.
Link email with campaign
Tick this check box to save your mailing as an attachment in your campaign after it has been sent.
Delete campaign
If this check box is ticked, your campaign is deleted from Salesforce when you press save. At the same time, the mailing list is deleted in Inxmail.
You can only a campaign if you close the connection to Inxmail and set the status to Completed or Aborted.
Please refer to the article Campaign Fields in Salesforce online help for more information on campaign settings specific to Salesforce.
-
-
Web-to-lead
A particularly interesting campaign setting is the Salesforce web-to-lead function. Once you create this type of campaign, a list will be created in Inxmail and all subscriptions will be transferred to Salesforce as new leads.
Activate the "Campaign generates leads" function in your campaign settings to enable web-to-lead.
Also activate the "Synchronize all leads" checkbox in the Inxmail Connector settings to specify that a new lead should also be created for recipients who have already been stored with a Salesforce ID in Inxmail Professional (i.e. for whom a value has already been entered in the SFDCID column).
-
Click "Save."
- You have created a new campaign.
Next step

