General procedure
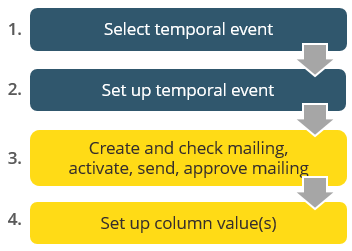
With timed trigger mailings, you select the desired time event, for example birthday, in the startup dialog. This determines the type of timed trigger mailing.
In the second dialog box, you make the desired time settings. This affects, for example, the time cycle in which you would like the trigger mailing to be sent. Afterwards you can create and check the trigger mailing in the same way as a standard mailing. You must then activate dispatch (Activating dispatch of timed trigger mailings). Approval is then granted in the same way as for standard mailings.
You can optionally combine the sending of the trigger mailing with one or more value setting actions, thereby setting or changing values in the columns of the recipients table.
The key steps described in the overview are shown in the diagram:
Overview of trigger mailing types
You can see an overview of the types of trigger mailings in the startup dialog. Click the ![]() (Show information) icon. An information window with an overview of the trigger mailing types is displayed.
(Show information) icon. An information window with an overview of the trigger mailing types is displayed.
Timed trigger mailings and target groups
With timed trigger mailings, the range and number of recipients is first established using the defined time event. This can, for example, result in a defined number of recipients who have birthdays on a particular day. You can further restrict the potential recipients using the target group in the ![]() Recipients workflow step. For example, you can send a birthday mailing to all recipients who belong to the ‘Priority customers’ target group and who have their birthday on a particular day.
Recipients workflow step. For example, you can send a birthday mailing to all recipients who belong to the ‘Priority customers’ target group and who have their birthday on a particular day.
Related topics
Inxmail Professional:
2 possible use cases
Depending on your contract, you might use Inxmail Professional in different ways:
-
As part of the Inxmail platform: You use newsletters & campaigns as your main tool for creating and sending newsletters. Inxmail Professional only serves as a recipient database and configuration tool in the background.
We are constantly expanding the functionality of “Newsletters & Campaigns”. Check out newsletters & campaigns section to find out if the feature you are looking for might already be available there.
-
Full scope: You use the legacy tool Inxmail Professional as your main tool for creating and sending newsletters.
Did you not find what you were looking for?
-
Send us your feedback.
