Step by step
To set up a new data source for Send time content, proceed as follows:
- Click the
 (Global settings) tab.
 - Click the
 Content agent.
 -
Click
 (Create new content source).
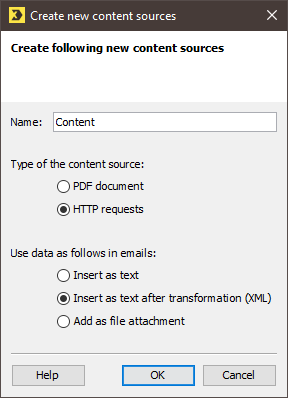
The Create new content sources dialog box is displayed.
 Field descriptions for ‘Create new content sources’ dialog box
Name
Description
Name
Enter a unique name for the data source. The data source will be integrated into the mailings as external content under this name.
Note: Please be aware that changing the name at a later point may cause problems if this content has already been integrated into a mailing.
Type of the content source
PDF document
Select this option if you would like to insert a personalised PDF document as an attachment to a mailing.
This might be a coupon, for example, in which recipient data is integrated.
This option is not relevant if you are setting up Send time content.
Detailed information can be found in the section Personalising PDF file attachments.
HTTP requests
Select this option in order to integrate Send time content.
Detailed information can be found in the section Send time content.
Use data as follows in emails
Insert as text
Select this option if the external content is to be integrated one-to-one in the mailing body.
Generally speaking, you select this option if you would like to integrate HTML files or parts thereof from an external Web server into the mailing. The HTML tags are interpreted in HTML mailings. In text mailings, they are ignored.
Insert as text after transformation (XML)
Select this option if the external content must be transformed before it is integrated into the mailing.
In general, this concerns XML files or XML feeds.
Detailed information can be found in the section Creating a transformation.
Add as file attachment
Select this option if you would like to send the external content as a mailing attachment.
Often this concerns files in PDF format that are personalised before sending, such as coupons, for example.
This option is not relevant if you are setting up Send time content.
- Specify your settings in the fields.
-
Confirm the dialog box by clicking OK.
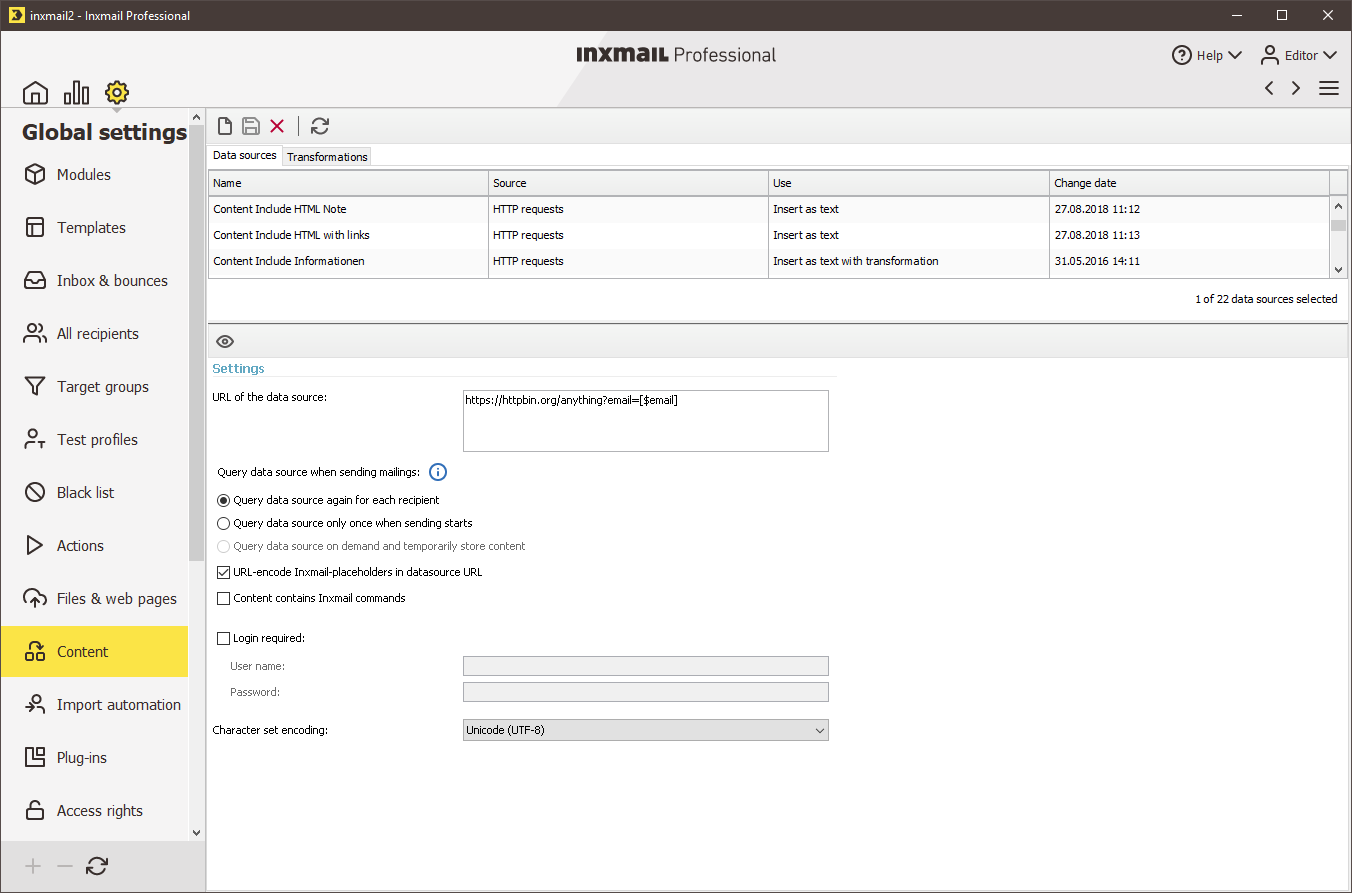
You will be directed to the page for entering the data source settings (Data sources tab).
 Field descriptions – ‘Settings’ for data source
Name
Description
Data source settings
URL of the data source
Enter the URL of the external data source.
This can be the URL to access the Web server or Web application, or the URL to directly access the file to be integrated.
If you are personalising the external content, you must add the necessary parameters to the URL.
Detailed information can be found in the section Personalising content.
Query data source when sending mailings
Retrieve the data source again for each recipient
The data source URL can be extended depending on recipient attributes and contain column values from a recipient record, for example. Inxmail Professional opens the URL for each recipient again and does not save the integrated content.
Select this option if the content for each recipient can differ.
Detailed information can be found in the section Personalising content.
Query data source once only when sending starts
The URL of the data source is the same for all recipients. Inxmail Professional opens the URL once when mailing dispatch starts, and saves the integrated content permanently with the mailing.
Select this option if the content is identical for all recipients.
If you select this option, the data source will not be subject to a high load, as only one query is generated. Please note that the mailing dispatch can still fail if the data source is not available at the sending time.
Retrieve the data source when necessary and cache the content
The data source URL can be extended depending on recipient attributes and contain column values from a recipient record, for example. Inxmail Professional opens the URL as necessary and saves the integrated content for the duration of the mailing dispatch, if possible.
Select this option if some of the recipients will receive the same content.
This option can be used to optimise the speed of the mailing dispatch. It requires appropriate configuration of the temporary storage on the Inxmail Professional Server.
This option is disabled by default. There are various requirements for using this option, such as appropriate configuration of the temporary storage on the Inxmail Professional Server. If you would like to enable this option, contact your Inxmail Professional administrator or customer care representative.
URL-encode Inxmail placeholders in datasource URL
Activate this option if you want the content of Inxmail placeholders to be URL-encoded. This means: All characters that are reserved according to RFC 3986 will be percent-encoded.
Note: By activating this option you might solve problems with special characters (e.g. "+") in Inxmail placeholders.
Content contains Inxmail commands
Enable this check box if the integrated content or the transformation contains Inxmail commands for processing (for example, commands for personalisation, conditions or modules).
A list of the Inxmail commands can be found in the section Commands.
Login required
If a user name and password are necessary to access the Web server or source file of the content, you can enter this data here.
The login is performed using basic authentication.
Character set encoding
Select the character set encoding for the data source or external content.
- Specify your settings in the fields.
- Save your entries.
- You have set up a new data source for Send time content.
Inxmail Professional:
2 possible use cases
Depending on your contract, you might use Inxmail Professional in different ways:
-
As part of the Inxmail platform: You use newsletters & campaigns as your main tool for creating and sending newsletters. Inxmail Professional only serves as a recipient database and configuration tool in the background.
We are constantly expanding the functionality of “Newsletters & Campaigns”. Check out newsletters & campaigns section to find out if the feature you are looking for might already be available there.
-
Full scope: You use the legacy tool Inxmail Professional as your main tool for creating and sending newsletters.
Did you not find what you were looking for?
-
Send us your feedback.


