In this step, you specify how the values of the import file are set up. The settings that you specify apply to the entire import file or for all import files. It is not possible to specify varying settings for individual import files, data records or data fields.
Step by step
To specify the file structure of the import file, proceed as follows:
- Open the import in the
 Settings workflow step.
 -
Click the Edit button next to File structure.
The File structure dialog box is displayed.
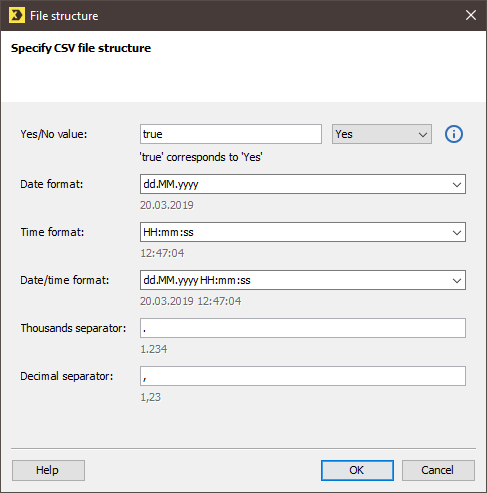
Note: The format specifications that can be made in the File structure dialog box are based on the ISO 8601 standard.
 Table – ‘File structure’ dialog box
Name
Description
Yes/No value
The setting that you specify here relates to all columns of the Yes/No data type, with the exception of the Tracking permission column.
Note: The setting for the Tracking permission column must be made separately in the Column assignment dialog box.
You can specify either the value for Yes or the value for No. If you have specified a value for Yes, all other values in the column will be interpreted by the system as No. If you have specified a value for No, all other values will be interpreted by the system as Yes.
You can enter any characters in the input field. The system does not distinguish between upper and lower case. You can also leave the input field empty. The system will then interpret empty data fields in the import file either as Yes or No, depending on the setting. (Please also see the examples Example 1: CSV import and Example 2: CSV import.)
Date format
Select the date format here.
You can also enter the date format manually. In this case, please follow the ISO 8601 standard.
The current date is then displayed below the list box or input field in the previously specified format.
Time format
Select the time format here.
You can also enter the time format manually. In this case, please follow the ISO 8601 standard.
The current time is then displayed below the list box or input field in the previously specified format.
Date/time format
Select the date/time format here.
You can also enter the date/time format manually. In this case, please follow the ISO 8601 standard.
The current date and time are then displayed below the list box or input field in the previously specified format.
Thousands
separatorEnter the thousands separator here.
Please note that the thousands separator and the decimal separator should not be identical.
Decimal separator
Enter the decimal separator here.
Please note that the decimal separator and the thousands separator should not be identical.
Example 1: Yes/No value
Import file
email,first name,surname,already a customer
a.allmeier@inxmail.de,Andreas,Allmeier,true
d.dannenberger@inxmail.de,Doris,Dannenberger,-
h.hemberger@inxmail.de,Herbert,Hemberger,-
j.bloggs@inxmail.de,Joe,Bloggs,true
p.petersen@inxmail.de,Petra,Petersen,true
Yes/No value

Data in Inxmail Professional
Notes
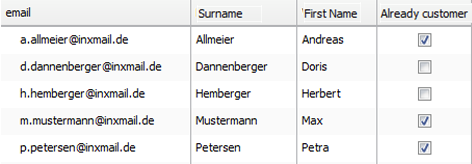
true was specified as the Yes value.
In Inxmail Professional, the Already a customer column has the Yes/No data type.
In Inxmail Professional, the check box in the Already a customer column is selected for all data records with the value true.
In Inxmail Professional, the check box in the Already a customer column is not selected for all data records with the value - (hyphen).
Example 2: Yes/No value
Import file
email,first name,surname,already a customer
a.allmeier@inxmail.de,Andreas,Allmeier,active
d.dannenberger@inxmail.de,Doris,Dannenberger,
h.hemberger@inxmail.de,Herbert,Hemberger,—
j.bloggs@inxmail.de,Joe,Bloggs,active
p.petersen@inxmail.de,Petra,Petersen,active
Yes/No value

Data in Inxmail Professional
Notes
active was specified as the Yes value.
In Inxmail Professional, the Already a customer column has the Yes/No data type.
In Inxmail Professional, the check box in the Already a customer column is selected for all data records with the value active.
In Inxmail Professional, the check box in the Already a customer column is not selected for all data records with the value '' (no entry) and ''—''.
-
Specify your settings in the fields.
You can choose values from the drop-down lists or you can enter valid values manually.
- Confirm the dialog box by clicking OK.
- You have now specified the format of the import data.
Related topics
Inxmail Professional:
2 possible use cases
Depending on your contract, you might use Inxmail Professional in different ways:
-
As part of the Inxmail platform: You use newsletters & campaigns as your main tool for creating and sending newsletters. Inxmail Professional only serves as a recipient database and configuration tool in the background.
We are constantly expanding the functionality of “Newsletters & Campaigns”. Check out newsletters & campaigns section to find out if the feature you are looking for might already be available there.
-
Full scope: You use the legacy tool Inxmail Professional as your main tool for creating and sending newsletters.
Did you not find what you were looking for?
-
Send us your feedback.
