Please only use scenario 3 as an absolute exception. We do not recommend it.
Important: In scenario 3, you must manually specify many settings yourself. The changes should only be made by experienced IT/mail server administrators. If you set up things incorrectly, you risk
If you implement scenario 3, it means that you are using a main domain to send your emails in
It means that you use the same domain for different sources to send emails, such as:
-
Newsletters
-
Transaction emails like order and invoice confirmations
-
Your emails for daily business correspondence
You can run into major problems with your reputation by mixing these things. For example, if a
On the other hand, if you differentiate the email types from each other, each domain builds its own reputation and the different sources to send emails do not affect one another.
There are many systems that send emails using your company name within the company. These include job portals, social media services and acquisition channels. These channels often exist in your company without the knowledge of your IT department. It is also referred to as shadow IT. Not all of these services sign your emails using DKIM, or even adhere to the other technical standards regarding
If you want to implement scenario 3, you need to set the DMARC policy of your main domain to ‘reject’, or at the very least to ‘quarantine’. To do so, you need to ensure that all systems sending emails using your company name adhere to your
-
you need to generate and evaluate complex XML reports in which you use the IP address to determine all programs and services that send emails using your company name.
-
You need to communicate with third-party service providers and require them to sign your emails using DKIM and adhere to your
This process is very involving and can take years depending on your IT infrastructure.
Conclusion: The easiest and most secure way of protecting your domain is to set up your own subdomain that you only use for
Scenario 3 is useful in the following cases only:
-
You want to use your main domain as a sending domain.
-
You would like to use the main domain or subdomain that you use in the

Prerequisite: You already authenticate your main domain or subdomain via ‘reject’ or ‘quarantine’ DMARC policy (outside of
Note: To protect your main domain from loss of reputation, we recommend using a subdomain as a sending domain. To do so, we recommend implementing either
-
In this scenario you have the assurance that the SPF and DKIM technologies are included for email authentication. DMARC authentication is valid under certain circumstances, depending on how your domain outside of
Prerequisite: The receiving mail server or spam filter interprets DMARC.
-
Authenticating your sender domain eliminates the need to display the Inxmail sender domain, as happens in the Outlook, Hotmail or Gmail email clients, for example.
-
You have the option to use your main domain as a sending domain.
-
You can use your sending domain (main domain or subdomain) outside of
Disadvantages: In this scenario, you have the following disadvantages compared to scenarios 1 and 2:
- No domain delegation:You may need to make any necessary changes to the domain authentication setup yourself. If you do not use domain delegation, this will not affect the deliverability, provided you specify all the settings yourself correctly. However, there may be more administrative work for you to carry out.
- No (automatic) domain alignment: Depending on the settings you specify, the sender domain, bounce domain and link tracking domain may differ in this scenario. This is evaluated negatively by many email service providers and anti-spam filters when it comes to classifying emails as spam.
- DMARC: In this scenario, you must specify your DMARC settings yourself. Changes made to the DMARC policy can have a major impact on the deliverability of emails for your domain (even outside of
Separate DMARC authentication required: Only implement scenario 3 if you already authenticate your main domain outside of
Do not start authenticating your domain in the
-
You have specified a domain.
-
You have stored your domain with your domain host.
-
You have decided on an
For the setup process outside the
Step by step
-
Open the
Sending domains agent.
-
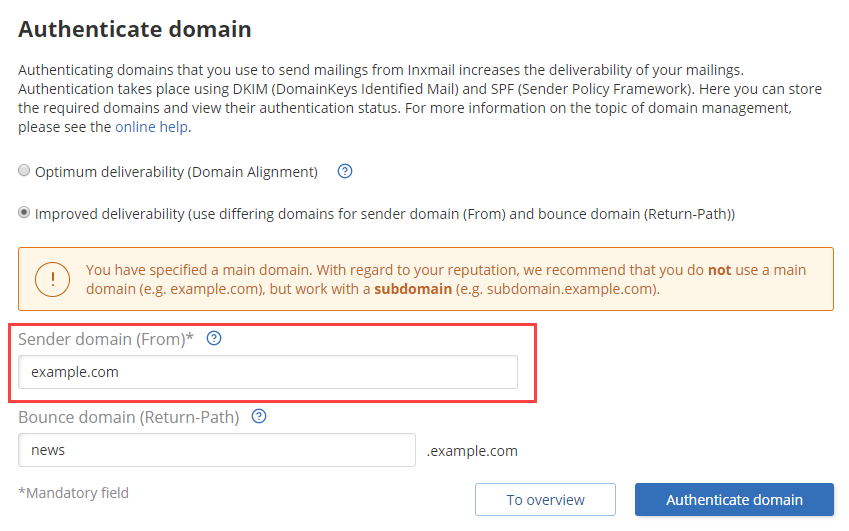
Select the Improved deliverability option.

-
In the Sender domain (From) input field, enter the domain that you want to use as the sender domain in
-
We recommend entering your own bounce domain in the Bounce domain (Return-Path) input field. This way you attain a
The bounce domain needs to be a subdomain of your authenicated main domain.
The bounce domain is visible in the mailing links: The bounce domain is visible in your mailing links later on. You should use a name for your bounce domain that is as neutral as possible (‘mail’, ‘news’ or ‘newsletter’, for example).

-
Click Authenticate domain.
You will be directed to the Domain authentication page.
-
Optional: Store your BIMI logo.
-
Enter the authenticated subdomain in the Inxmail Professional list settings. You must adjust the list settings in each list if you want the settings from the
Sending domains agent to be active for all lists.
-
You have authenticated your Domain in the
Related topics
-
Sending domains: Optimize the deliverability of your mailings
-
For answers to frequently asked questions, see the
Inxmail Professional:
2 possible use cases
Depending on your contract, you might use Inxmail Professional in different ways:
-
As part of the Inxmail platform: You use newsletters & campaigns as your main tool for creating and sending newsletters. Inxmail Professional only serves as a recipient database and configuration tool in the background.
We are constantly expanding the functionality of “Newsletters & Campaigns”. Check out newsletters & campaigns section to find out if the feature you are looking for might already be available there.
-
Full scope: You use the legacy tool Inxmail Professional as your main tool for creating and sending newsletters.
Did you not find what you were looking for?
-
Send us your feedback.
