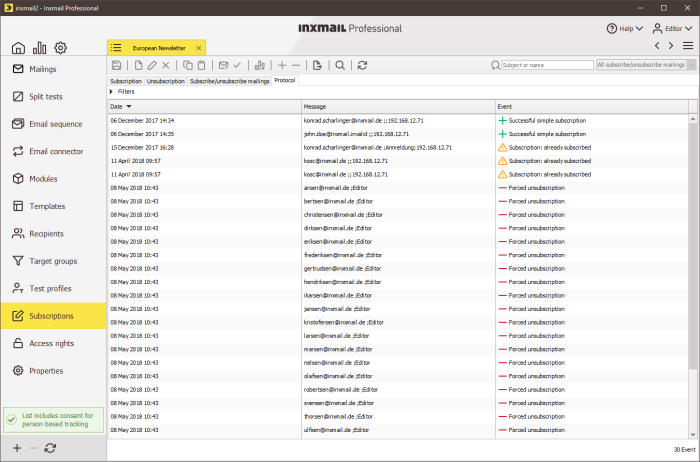
Displaying and filtering the subscribe/unsubscribe log
Step by step
-
On the tab of the mailing list, click the
 Subscriptions agent > Log tab.
The log entries are displayed.You can use the log to track when and how recipients were subscribed or unsubscribed.
The following subscribe and unsubscribe options (Overview: Subscription and unsubscription) are logged:
-
Recipients who have already subscribed to or unsubscribed from a mailing list are manually unsubscribed or subscribed (Manually resubscribing recipients)
-
Recipients are subscribed or unsubscribed via actions (Actions)
-
Recipients subscribe or unsubscribe themselves using a form on your web page (‘Subscription’ Web page)
-
Recipients subscribe to or unsubscribe from a mailing list by email (Mailing list subscription and unsubscription by email)
-
Recipients unsubscribe themselves using an unsubscribe link in a mailing sent to them (Using unsubscribe links)
-
Recipients unsubscribe from the mailing list themselves in the email client using the standardised ‘list-unsubscribe’ unsubscribe procedure (Unsubscription setup)
-
Unsubscribing deleted recipients (Unsubscribing deleted recipients)
Each event in the subscribe or unsubscribe process is logged. The log has the following columns:
- Date: This column shows when exactly a person was subscribed or unsubscribed (date and time).
- Message: This column can contain the email address of the subscribed or unsubscribed person, additional information (for example, the ID of the task object or form name of the JSP web page) and the IP address from which the recipient subscribed or unsubscribed.
- Event: This column shows which event was logged (for example, whether an event was logged during a subscribe process (
 symbol) or unsubscribe process (
 symbol)).
If an unconfirmed subscription or unsubscription event has been logged in this column (for the double opt-in or double opt-out methods), you can manually force the subscription or unsubscription of the recipient as follows:
-
- Select the log entry for the event in the table.
- Click the
 (Force subscription) button or the
  (Force unsubscription) button.
 - To filter the log entries, proceed as follows:
- To expand the filter settings, click the Filters button.
- Use the option buttons (Do not use a date filter, The last ... days, From... to...) to define whether a date filter is to be applied.
- Use the Only following events check box to define whether the table is to be filtered according to the Event column. Then choose which logged events are to be displayed in the table from the drop-down list.
- Click the Apply filter button.
The log display is updated.
- The log entry table now contains only the log entries that match your filter settings.
Related topics

