Map the fields from Salesforce to the columns in Inxmail Professional. You may need to add certain columns in Inxmail Professional beforehand.
Step by step
-
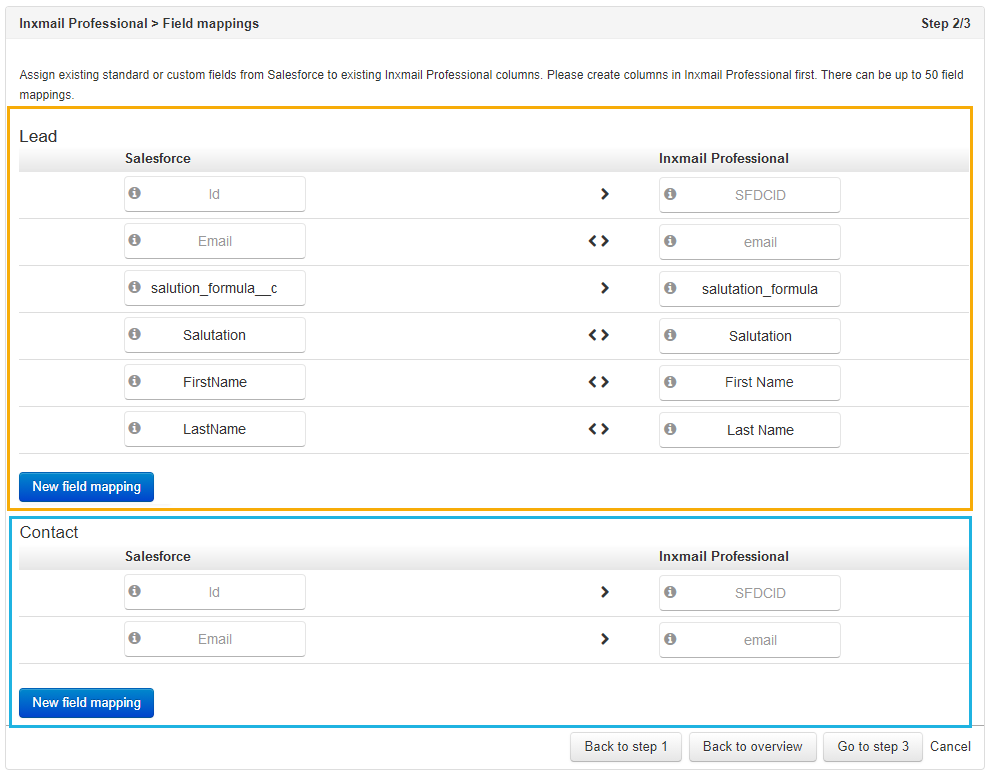
Open "Step 2: Field mappings". You'll see a mapping table which you can use to map fields in Salesforce to the columns in Inxmail Professional.
The table is split into two panels: "Lead" and "Contact".
-
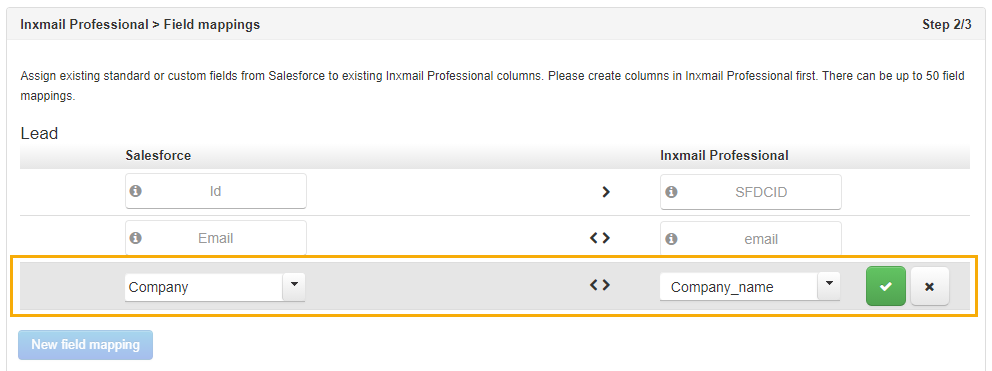
Click "New field mapping" in the "Lead" or "Contact" panel.
-
Select an entry from the drop-down menu in the "Salesforce" column.
Based on what data type you choose, you will also need to select a sub-entry as well.
The selection list in the "Inxmail Professional" column is activated once you have completed all the Salesforce fields.
-
Select a column under Inxmail Professional that corresponds to the Salesforce entries.
-
Click
 "Confirm field mapping" to confirm the mapping.
Click
 "Discard field mapping" to delete the newly added row again.
 Edit field link
Special columns: You cannot edit or delete the field mappings for the Inxmail Professional columns "SFDCID" and "email". You need them for the Salesforce integration to work.
Function
Description
Edit field link
Allows you to edit an existing field link.
Click
 Edit field link on the right-hand side of column assignment.
The drop-down lists under Salesforce and Inxmail Professional are active. Change one or multiple data fields, if necessary, and confirm your entries with
Confirm field link.Delete field link
Deletes an existing field link.
Click
 Delete field link on the left-hand side of column assignment. The field link is deleted after you confirm the security question.System fields for data transfer
In addition to the field mapping shown, the following system fields are used to transfer data between Salesforce and Inxmail Professional:
Field name (Salesforce)
Object
Intended use
Id
Contact, lead
ID of the Salesforce object. Stored in the ‘SFDCID’ column in Inxmail Professional.
inx__recipient_id
Contact, lead, campaign member
Recipient ID from Inxmail Professional.
inx__list_id
Campaign
List ID from Inxmail Professional
inx__email_is_invalid
Contact, lead
Hard bounce information from Inxmail Professional
- You have created a new field mapping between Salesforce and Inxmail Professional.
How many field mappings can you add? You can create up to 50 field mappings.
Next step
-
Click "Go to step 3" to make advanced settings in Inxmail.

