Step by step
To create a new recipient column in a mailing list, proceed as follows:
- Open the recipient table.
-
Click the
 (Configure columns) button and select Create new column.
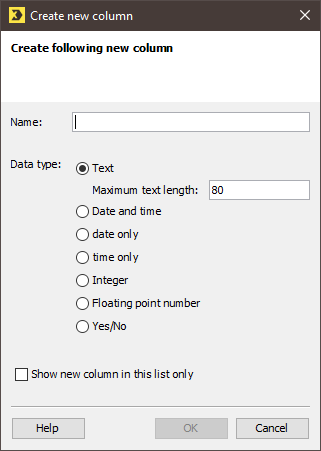
A dialog box appears.
-
Enter a name for the new column in the dialog box.
Note: Avoid using umlauts and special characters in column names.
-
In the dialog box, select the appropriate column type (that is, the data type of the column):
Column type
Description
Text
Recipient data in this column may contain text and numbers of various string lengths (up to 255 characters).
Date and time
Recipient data in this column may contain date values and time values.
date only
Recipient data in this column may contain date values only.
time only
Recipient data in this column may contain time values only.
integer
Recipient data in this column may contain whole numbers only (for example, ‘-1’ or ‘45’).
Floating point number
Recipient data in this column may contain decimal numbers only (for example, ‘3.56’ or ‘-0.75’).
Yes/No
Recipient data in this column may contain the values ‘Yes’ or ‘No’ (for example, if the values from radio buttons or check boxes are saved in the columns).
By selecting the appropriate column type you ensure that:
- no incorrect values are entered in the recipient data.
- specific operations can be carried out (for example, analysis of monthly values).
- target group filters and case differentiations are created more easily.
- data volumes are reduced, which means that the total speed of the system is increased.
-
comparisons with existing databases are simplified.
 Example
- Assign the ‘Text’ data type to columns that contain elements such as surnames, first names, streets or cities.
- Assign the ‘Date’ data type to columns that contain the birthday of recipients.
-
If you selected the ‘Text’ column type, enter the maximum allowed text length in the dialog box.
The maximum text length should not exceed 255 characters.
- If you want your new column to be visible in the current recipient table only (and not in the recipient tables of other mailing lists or in the global settings), select the Show new column in this list only check box in the dialog box.
- Confirm your entries by clicking OK.
- Depending on the settings you specified, your new column will either appear in the current recipient table only or it will appear in all the recipient tables. If you move the mouse over the column header, you can see the column type defined for the column.
Related topics
Inxmail Professional:
2 possible use cases
Depending on your contract, you might use Inxmail Professional in different ways:
-
As part of the Inxmail platform: You use newsletters & campaigns as your main tool for creating and sending newsletters. Inxmail Professional only serves as a recipient database and configuration tool in the background.
We are constantly expanding the functionality of “Newsletters & Campaigns”. Check out newsletters & campaigns section to find out if the feature you are looking for might already be available there.
-
Full scope: You use the legacy tool Inxmail Professional as your main tool for creating and sending newsletters.
Did you not find what you were looking for?
-
Send us your feedback.
