Typical form fields for the ‘Subscription’ Web page
The ‘Subscription’ Web page normally contains just a few input fields or form fields. In accordance with the rules of the CSA (Certified Senders Alliance) and the principle of data minimisation, only the input field for the email address should be a mandatory field.
Note: The general rule is to collect only as much personal data as is absolutely necessary for the respective application. In email marketing, this is normally only the email address.
In addition to being asked for their email address, the recipient is frequently asked to enter their title, first name and surname. A typical ‘Subscription’ Web page looks something like this:
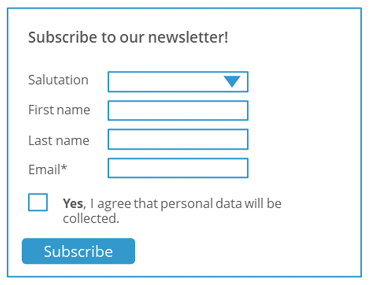
The ‘Subscription’ Web page shown above is used to subscribe to only one newsletter. Therefore, the title of the newsletter is not displayed.
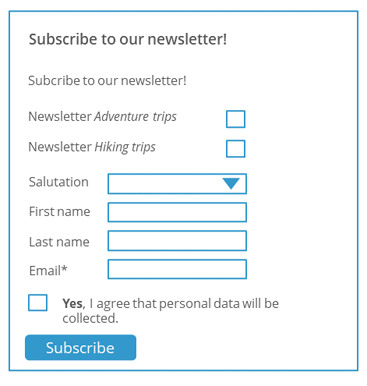
If you would like to give recipients the possibility to order multiple newsletters, you can display the title of each newsletter and a check box beside it. The recipient can select which newsletter they would like to subscribe to by enabling the respective check box.
Designing form fields with your own CSS classes
You can store your own CSS classes in the CSS class field for all form fields of the ‘Subscription’ Web page. You can maintain the respective CSS class both within the dynamic Web page under Style > Stylesheet or in an external stylesheet. You can integrate the external stylesheet under Style > Stylesheet URL. For further information, please see Designing form fields with your own CSS classes.
Overview of form fields
Below is an overview of the form fields that are usually used in a ‘Subscription’ Web page. This is followed by an overview of form fields that you will use only occasionally in a ‘Subscription’ Web page.
The general procedure for adding form fields to a form is described in the section Adding a text field (form field) to a form.
Frequently used fields for a ‘Subscription’ Web page
|
Name |
Description |
|---|---|
|
Headline |
You use this form element to insert a heading on the Web page. |
|
Subscription |
You use this form element to insert a check box on the Web page. This check box allows users to subscribe to one of your mailing lists. |
|
Setting |
|
|
Name |
In this field, you enter a name for the check box (for example, Study trips). Note: If you leave this field blank, Inxmail Professional automatically uses the name of the mailing list that you assign via the List drop-down list. |
|
List |
In this drop-down list, you select the mailing list that users can subscribe to using the form element. |
|
Setting |
In this drop-down list, you can set the following:
|
|
Tracking GDPR |
Use this form element to obtain consent to person-based tracking from your newsletter recipients. |
|
Obtaining consent through a check box |
If you select this option, Inxmail Professional generates a check box on the subscription form that the interested party or newsletter recipient will have to enable in order to give consent to person-based tracking.
The text from the Explanatory text on personalised tracking text field will be displayed alongside the check box. We recommend enabling this option, since this requires the interested party or newsletter recipient to actively give consent by taking deliberate action. If the interested party or newsletter recipient enables the check box, the value GDPR The GDPR (General Data Protection Regulation) will come into effect on 25 May 2018 and immediately require you to obtain declarations of consent for the use of personal data. You can find more detailed information on our website. |
|
Considering consent to have been given through subscription to the newsletter (not recommended) |
If you select this option, the text from the Explanatory text on personalised tracking text field will merely be displayed on the subscription form.
We recommend against selecting this option, since this does not require interested parties or newsletter recipients to actively give consent by taking a deliberate action. When the interested party or newsletter recipient subscribes to the newsletter, the value GDPR The GDPR (General Data Protection Regulation) will come into effect on 25 May 2018 and immediately require you to obtain declarations of consent for the use of personal data. You can find more detailed information on our website. |
|
Drop-down list |
You use this form element to insert a drop-down list on the Web page. In the drop-down list, users can select values (selection items) that you have defined. |
|
Setting |
|
|
Name |
In this field, you enter a name for the drop-down list (for example, ‘How did you find us?’). If you leave this field blank, Inxmail Professional automatically uses the name of the recipient table column that you assign in the Column field (below). |
|
Column |
You use this drop-down list to assign a recipient table column. Inxmail Professional stores the value users selected in the form element in this recipient table column for every user. ‘Profile management’ Web page: If a value is already stored for the user in this recipient table column, then this value is preselected in the drop-down list when the Web page is called up. Otherwise, Inxmail Professional automatically uses the value you specify first in the Values field as the default selection. |
|
Multiple |
If you enable this check box, the user will be able to select multiple items from the drop-down list (with the CTRL key held down). |
|
Lines |
Typically, only one item is displayed for a drop-down list; the user must click to open the drop-down list and see further items. The Lines field allows you to specify that multiple items should be initially displayed. |
|
Setting |
In this drop-down list, you can set the following:
|
|
Values |
In this field, you enter all values that are to appear as selection items in the drop-down list. Enter the values in the format ‘internal value;displayed name’ (for example, ‘f;female’). The internal value is stored in the recipient table column specified in the Column field. The displayed name is displayed as a selection item in the drop-down list. If the internal value and the displayed name are the same, then you can also enter the value in the format ‘Value’ (for example, ‘female’). Separate the individual values with ‘\n’ (for example, ‘f;female\nm;male’). |
|
Text field |
You use this form element to insert a one-line text field on the Web page. Users can either enter a new text in this text field or change a text already displayed there. You set up this form element using the following fields: (Text already displayed on the Web page is the text that is stored for the current user in the recipient table column selected in the Column drop-down list (below)). |
|
Name |
In this field, you enter a name for the text field (for example, ‘First name’). If you leave this field blank, Inxmail Professional automatically uses the name of the recipient table column that you assign in the Column field (below). |
|
Column |
You use this drop-down list to assign a recipient table column of the ‘Text’ data type. Inxmail Professional stores the data entered by users in the text field of the Web page in this recipient table column for every user. Before you can select the relevant recipient table column in the Column drop-down list, you must create it in the recipient table of the relevant mailing list (Creating a new column). If you assign a recipient table column of a different data type, Inxmail Professional cannot store the entered data. An error message is displayed. ‘Profile management’ Web page: If data is already stored for the user in this recipient table column, then this data is displayed in the entry field when the Web page is called up. |
|
Setting |
In this drop-down list, you can set the following:
|
|
Radio button |
You use this form element to add one or more option buttons to your Web page. Users may select only one of them. |
|
Settings |
|
|
Name |
In this field, you enter a name for the Radio button form element (for example, ‘Salutation’). If you leave this field blank, Inxmail Professional automatically uses the name of the recipient table column that you assign in the Column field (below). |
|
Column |
In this drop-down list, you assign a recipient table column of the ‘Text’ data type. The option button users selected in the form element is stored for every user in this recipient table column (see also Value field below). ‘Profile management’ Web page: If a value is already stored for the user in this recipient table column, then the corresponding option button of the form element is preselected when the Web page is called up. Otherwise, the first option button of the form element is always preselected when the Web page is called up. |
|
Setting |
In this drop-down list, you can set the following:
|
|
Value |
You use this field to add an option button (value) to the form element. You can add several option buttons to the Radio button form element (users will be able to select only one of them). To do this, add the Value field multiple times to the editing area (Opening and expanding the editing area). When entering the option button in the Value field, enter it in the format ‘internal value;displayed name’ (for example, ‘m;Mr’). The displayed name is specified as the name of the option button (for example, ‘Mr’). If the user selects the option button on the Web page, the internal value (for example, ‘m’) is stored in the recipient table column specified in the Column drop-down list. |
Inxmail Professional:
2 possible use cases
Depending on your contract, you might use Inxmail Professional in different ways:
-
As part of the Inxmail platform: You use newsletters & campaigns as your main tool for creating and sending newsletters. Inxmail Professional only serves as a recipient database and configuration tool in the background.
We are constantly expanding the functionality of “Newsletters & Campaigns”. Check out newsletters & campaigns section to find out if the feature you are looking for might already be available there.
-
Full scope: You use the legacy tool Inxmail Professional as your main tool for creating and sending newsletters.
Did you not find what you were looking for?
-
Send us your feedback.
