Note: Before sending your mailing, be sure to test it thoroughly and assign recipients to the mailing. If a mailing has to be approved before it is dispatched, you will not be able to send the mailing or schedule it for dispatch until it has the ‘Approved’ status. Exception: You have the Inxmail Professional ‘Send mailing without approval’ right.
Step by step
-
Open the mailing (that is ready for sending) in the
 Dispatch workflow step.
 - To send test emails for checking once again before actual dispatch begins, click the
 Send test emails button.
 -
To schedule the mailing for (later) dispatch, so that the mailing will automatically be sent at a particular point in time, click the
 Start sending at the scheduled time button.
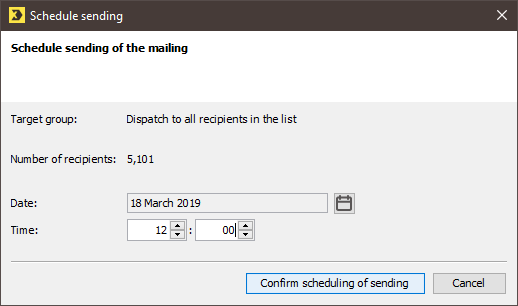
A dialog box appears.
In the dialog box, enter the date and time when dispatch should automatically begin and confirm by clicking the Confirm scheduling of sending button.
A message box in which you must confirm the configuration of automatic dispatch by clicking Yes will appear.
The mailing will be closed. On the mailing list tab >
 Mailings agent > Mailings tab, you will be able to see in the Information column of the table that the mailing was scheduled for dispatch. The mailing will also receive the symbol .
 -
Click the
 Start sending now button to send the mailing immediately.
A dialog box appears.
-
Click the Send button in the dialog box.
A message window in which you need to confirm the dispatch by clicking Yes is displayed.
The mailing will be closed. On the mailing list tab >
 Mailings agent > Mailings tab, you will be able to see in the Information column of the mailing table that the mailing is currently being sent. The mailing will also receive the
  symbol. Once the mailing has been sent, information on the send status will be updated in the Information column, and the mailing will receive the
  symbol.
- You have successfully made your dispatch settings and/or sent your mailing.
Related topics
Inxmail Professional:
2 possible use cases
Depending on your contract, you might use Inxmail Professional in different ways:
-
As part of the Inxmail platform: You use newsletters & campaigns as your main tool for creating and sending newsletters. Inxmail Professional only serves as a recipient database and configuration tool in the background.
We are constantly expanding the functionality of “Newsletters & Campaigns”. Check out newsletters & campaigns section to find out if the feature you are looking for might already be available there.
-
Full scope: You use the legacy tool Inxmail Professional as your main tool for creating and sending newsletters.
Did you not find what you were looking for?
-
Send us your feedback.


