You can initiate and perform the approval process at two places:
- In the mailing overview using the
 Request approval button.
 - In the
 Approval workflow step via the
  Request approval button.
Clicking the relevant button always takes you to the same dialog box, namely Request approval Step 1/2.
Step by step
Start the approval process by clicking the ![]() Request approval button in the
Request approval button in the ![]() Approval workflow step as follows:
Approval workflow step as follows:
- Open the mailing in the
 Approval workflow step.
 -
Click the
 Request approval button.
A dialog box appears.
Bypass approval process
If you have the Bypass approval right, the Immediately approve mailing dialog box will be displayed to you before the Request approval dialog box (Overview: Rights).The fields in the dialog box may be pre-filled with values, if these approval settings have been preconfigured system-wide or for this particular mailing list (Setting up the properties of mailing lists). You can, however, change the preconfigured settings if necessary.
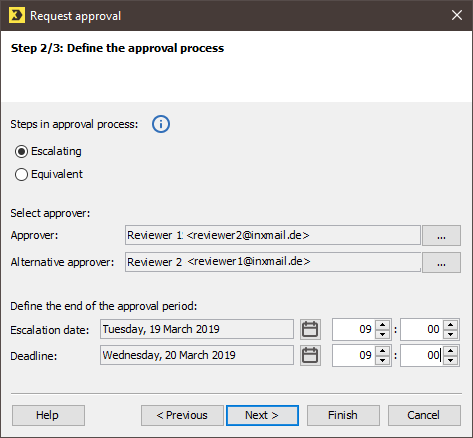
- Select the approval type: Escalating or Equivalent.
-
Depending on the approval type, select either two approvers or a primary approver and an alternative approver.
One reason for changing a preconfigured approver could be if, for example, you know that the preconfigured approver is currently on holiday.
However, you cannot create a new approver from this point. These must be created in the
 Properties agent (Creating new approvers).
 - If you selected the ‘Escalating’ approval type, you must specify an escalation date. If the (primary) approver does not react by this date, approval is forwarded to the alternative approver.
-
Enter the deadline by which the approvers must react to the approval request.
If none of the selected approvers respond before this deadline, the approval request is void and the mailing status is set to ‘Not approved’. You must then request approval again.
-
Click Next.
A dialog box appears.
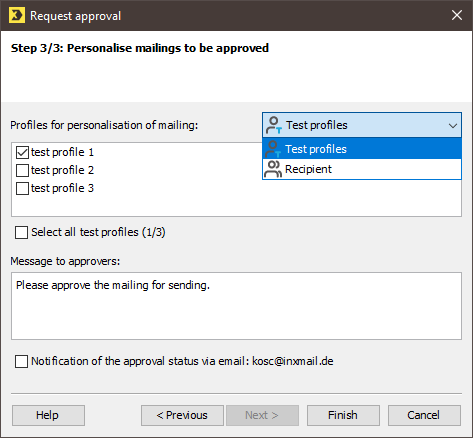
- You can select profiles to be applied when the approvers view the mailing (for example, if the mailing contains personalised or customised text). Proceed as follows:
-
To select created test profiles, select Test profiles in the drop-down list.
A list of already created test profiles is displayed below the drop-down list.
Select the relevant test profile.If you have not yet created a test profile, an error message appears to this effect.
- To select recipient profiles, select Recipients in the drop-down list.
A list of recipient profiles is displayed below the drop-down list.
Select the relevant recipient profile. - You can add notes for the approvers under Message to approvers.
-
If you wish to be informed by email of the status of the approval request, select Receive email notification of approval status.
The email will be sent to your Inxmail Professional email address (specified on the
 (Global settings) tab >
  Users agent).
 - To send the approval request, confirm your entries by clicking Finish.
-
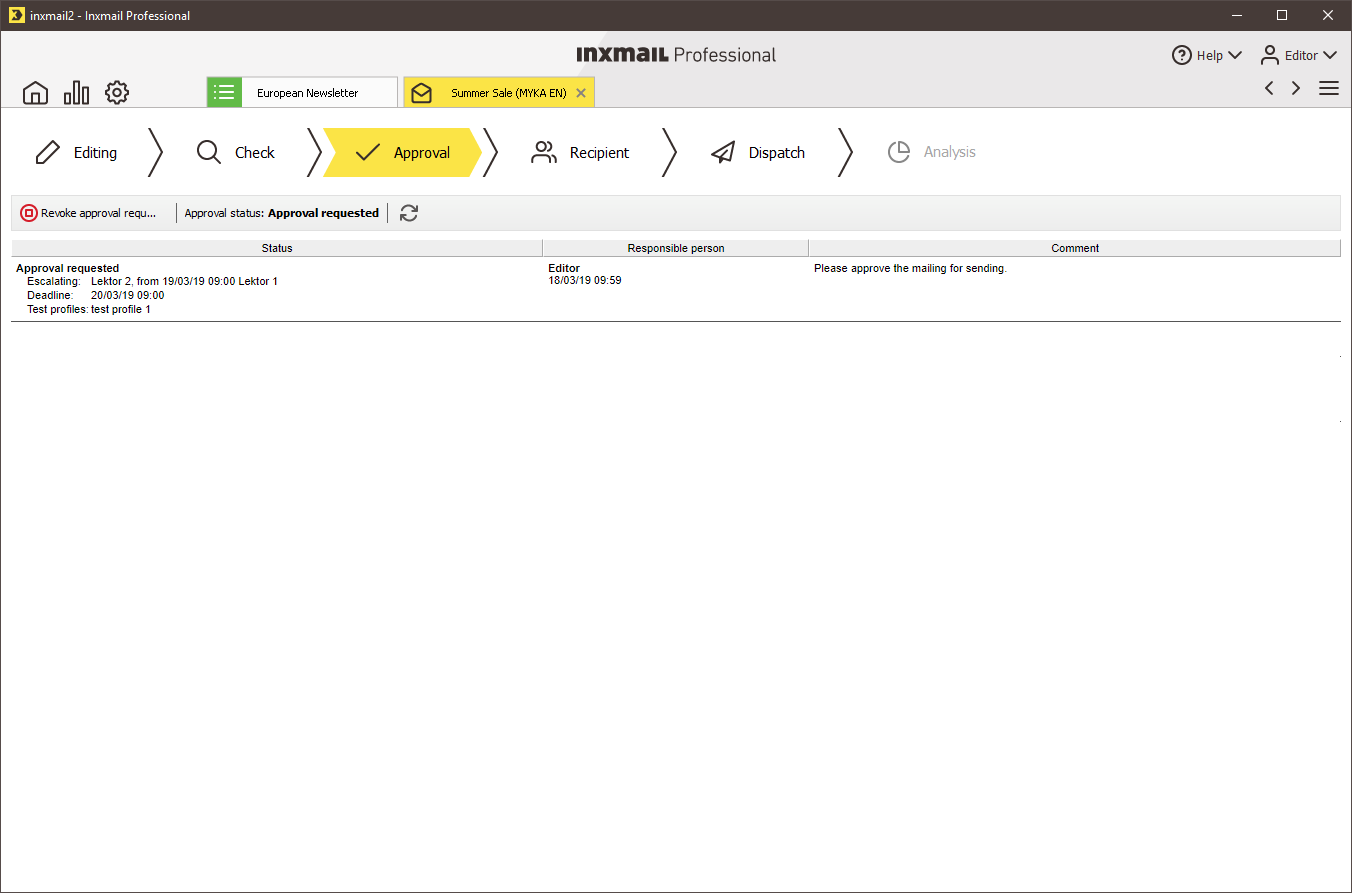
The approval request has been sent. The mailing is assigned ‘Approval requested’ status and can no longer be edited.
Additional information
If you need to make last-minute changes to the content after sending the approval request, you may revoke the approval request. To do so, click the ![]() Revoke approval request button. You may enter a comment that will be visible to the approver on the approval web page.
Revoke approval request button. You may enter a comment that will be visible to the approver on the approval web page.
Inxmail Professional:
2 possible use cases
Depending on your contract, you might use Inxmail Professional in different ways:
-
As part of the Inxmail platform: You use newsletters & campaigns as your main tool for creating and sending newsletters. Inxmail Professional only serves as a recipient database and configuration tool in the background.
We are constantly expanding the functionality of “Newsletters & Campaigns”. Check out newsletters & campaigns section to find out if the feature you are looking for might already be available there.
-
Full scope: You use the legacy tool Inxmail Professional as your main tool for creating and sending newsletters.
Did you not find what you were looking for?
-
Send us your feedback.


