Step by step
Open the Create new module dialog box as follows:
- To create a new module that will only be available for one particular mailing list, click the tab of the mailing list >
 Modules agent. Then click the
  (Create new module) button.
 -
To create a global module that will be available for all mailing lists, click the
 (Global settings) tab > Modules agent. Then click the (Create new module) button.
A dialog box appears.
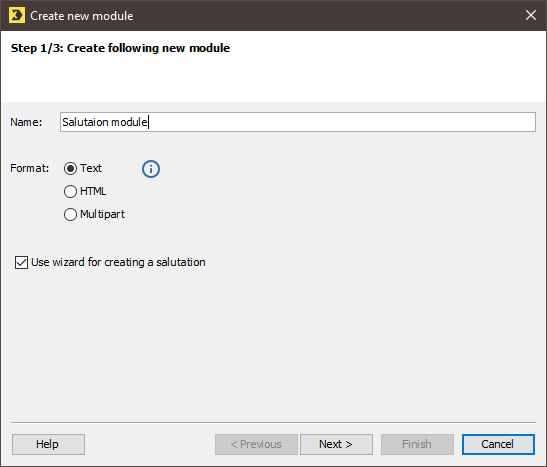
- In the dialog box, enter a name for the module (for example, Salutation).
-
Select the format of the module in the dialog box.
The format determines in which mailings you can later use the module:
- Text modules can be used for text, HTML and multipart mailings.
- HTML modules can be used in HTML and multipart mailings.
-
Multipart modules can be used for text, HTML and multipart mailings.
Note: Click the information button if you wish to see more detailed information on the individual formats.
- Enable the Use wizard for creating a salutation check box.
-
Click Next.
A dialog box appears.
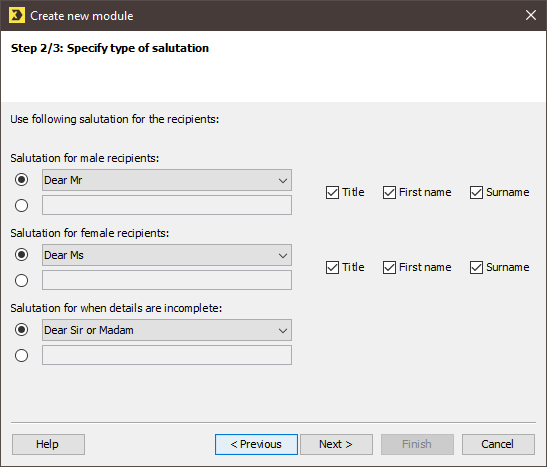
- Define the type of salutation.
-
Standard salutation
You can select a gender-specific standard salutation from the Salutation for male recipients and/or Salutation for female recipients drop-down lists (for example, Dear Mr).
To address cases where the recipients’ details are missing, select a gender-neutral salutation from the Salutation for when details are incomplete drop-down list (for example, Dear Sir or Madam).
-
Own salutation wording
Enable the respective option buttons if you wish to create your own salutation wording (for example, for a foreign-language salutation).
-
Specification of title, first name and/or surname
Use the check boxes on the right-hand side of the dialog box to specify how the recipient is to be addressed. The Surname check box is enabled by default. You can additionally enable Title and/or First name, or disable all check boxes.
-
Click Next.
A dialog box appears.
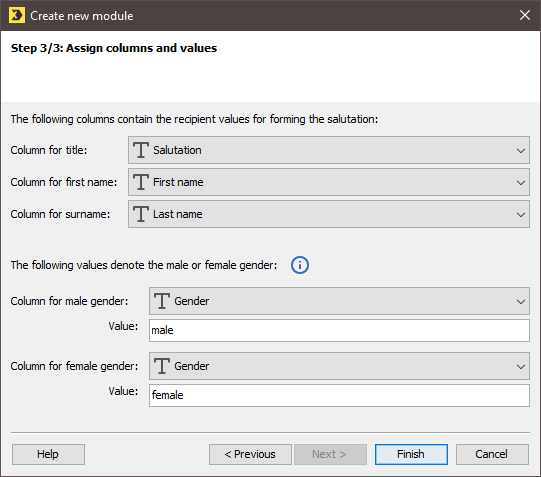
- Specify which columns from the recipient table are to be used to create the salutation.
- Depending on your previous selection, use the Column for title, Column for first name and/or Column for surname drop-down lists to select the columns that contain the recipient values for forming the personalised salutation.
-
Under The following values denote the male or female gender, specify the columns and the values that define the male and female genders.
Note: If gender is defined through multiple values in your recipient table (for example, based on the import of recipient data), you can enter these values separated by a semicolon (for example, for the female gender: female;f;Ms).
- Confirm your settings by clicking Finish.
-
The new salutation module is created and is opened in the
 Editing workflow step.
You can revise the module in the editor manually, if necessary.
In the
 Check workflow step, you can check the contents for selected test profiles or recipients.
Related topics
Inxmail Professional:
2 possible use cases
Depending on your contract, you might use Inxmail Professional in different ways:
-
As part of the Inxmail platform: You use newsletters & campaigns as your main tool for creating and sending newsletters. Inxmail Professional only serves as a recipient database and configuration tool in the background.
We are constantly expanding the functionality of “Newsletters & Campaigns”. Check out newsletters & campaigns section to find out if the feature you are looking for might already be available there.
-
Full scope: You use the legacy tool Inxmail Professional as your main tool for creating and sending newsletters.
Did you not find what you were looking for?
-
Send us your feedback.
