Add custom fonts as web fonts in the ![]() Fonts navigation item.
Fonts navigation item.
General requirements
Add your font via URL to a .css file
A direct integration of the font file (e.g. via .woff, .woff2 or .ttf file) is not possible.
-
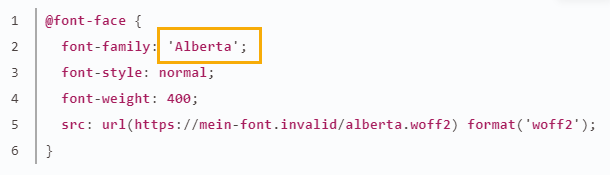
Right: https://my-font.example.com/alberta.css
-
Wrong: https://my-font.example.com/alberta.woff2
@font-face {
font-family: 'Alberta';
font-style: normal;
font-weight: 400;
src: url(https://my-font.example.com/alberta.woff2) format('woff2');
}Make sure that your .css file and font file are located on a web server that is accessible without any restrictions.
What does "accessible without any restrictions" mean? The URLs must be accessible from any computer without the need for a login, for example. IP restrictions are also not permitted.
Make sure that the web server where your .css file and font file are stored is https encrypted. Http-URLs are not allowed due to spam protection.
You cannot create a font with the same name a second time. If you want to change the configuration of a web font, you must first delete the font with the same name before you can create a new font.
Depending on where a font is hosted and how it is integrated, you have to take into account the respective data protection regulations when using web fonts – in particular the provisions of the General Data Protection Regulation (GDPR) – and the associated information obligations towards your recipients.
Especially in the case of fonts from US or third-country providers outside the EU / countries with an adequacy decision, you should carry out a data protection assessment before using web fonts.
For example, when integrating custom fonts from US web services such as Google Fonts, Adobe Fonts, etc., the IP address of your email recipients, among others, could be transmitted when connecting to the servers hosting the web font. Notably, that's the case when Google Fonts are being loaded with default settings.
We also recommend an evaluation from an information security law perspective as well as an evaluation of the use of web fonts with regard to the respective copyrights.
How can I use web fonts in compliance with GDPR?
-
Only use web fonts with GDPR-compliant hosting: Option 1 is that you only use fonts from providers who ensure that loading the font is in compliance with GDPR. These can be, for example, fonts that are hosted in the EU or where the providers ensure that, for example, no personal data of users or recipients is transferred when connecting to US servers.
This clearly excludes Google Fonts. You should also be careful when using other US-hosted web fonts, such as Adobe Fonts.
If you want to be on the safe side, only use so-called "web-safe fonts".
-
Provide web font by yourself and in compliance with GDPR: Option 2 is that you host the web font yourself or ensure in other ways that hosting and loading the font is in compliance with GDPR.
-
Obtain consent from recipients: Option 3 is that you do use web fonts and personal data is transferred when these fonts are loaded. However, you legally protect yourself by obtaining consent from your users and recipients.
-
For newsletters that are accessed through an email client, you can request consent e.g. via the registration form.
-
For web email archives and transactional mail systems, you can use a consent banner.
-
There is currently no viable solution for the case of forwarding emails or web view links.
-
Note: We advise you to closely coordinate with your data protection officer in all cases.
Step by step
-
Open the
 Fonts navigation item in the settings.
 -
Click .
-
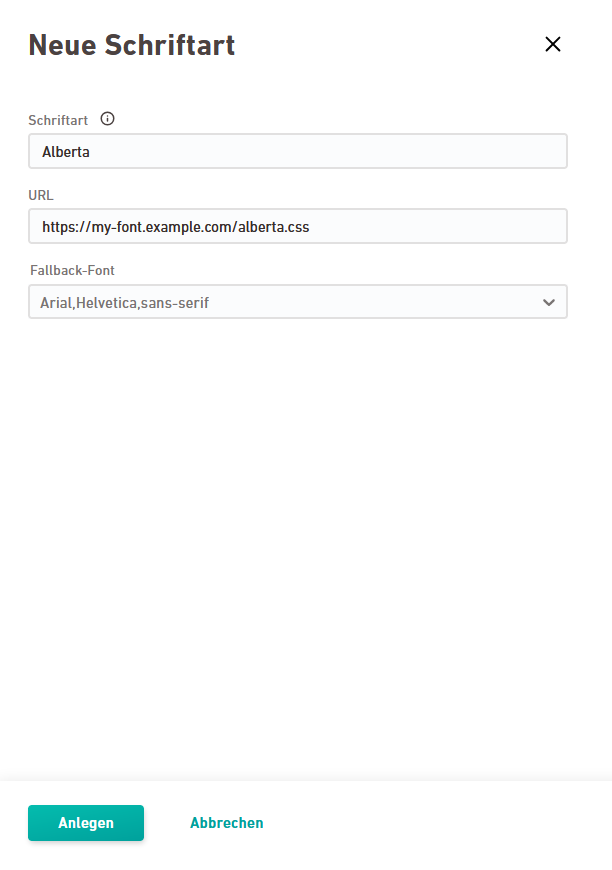
Enter the name of your font
Write the name of the font without quotes and exactly as it appears in the @font-face declaration of your .css file, e.g. Alberta.
 Note: If you write the name differently, it will not be recognized later, in the mailing.
 -
Enter the path to your .css file.
 Example content of the .css file
Copy
Example content of the .css file
Copy@font-face {
font-family: 'Alberta';
font-style: normal;
font-weight: 400;
src: url(https://mein-font.invalid/alberta.woff2) format('woff2');
} -
Select a fallback font from the drop-down list. Depending on which custom font you have stored, a fallback font with or without serifs is more suitable.
When will the alternative font be shown?
There are cases when the stored font cannot be downloaded or is not supported by an email client.
Therefore, we give you a set of alternative fonts to choose from. These alternative fonts are installed by default on most computers, e.g. Arial or Times New Roman.
What happens if I don't select anything?
If you do not select anything, the default setting will apply: Arial,Helvetiva,sans-serif.
- Click .
- You have saved your custom font as a web font.
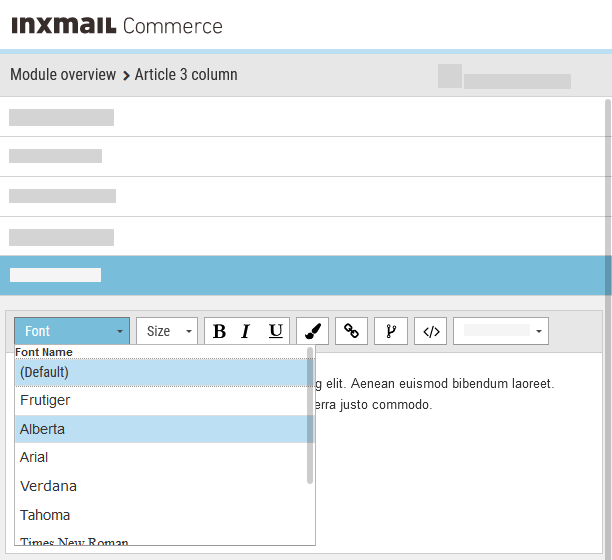
You can now select the font for formatting your mailing texts, see Inserting and editing text.
You must create your fonts before you want to use them in your mailings: You cannot update the fonts that are available for selection in an existing mailing in retrospect. You have to create a new mailing in order to use newly created web fonts.
Once stored, the setup for your font cannot be changed. If you want to change the settings for a font (e.g. because the URL has changed), you have to delete the font and create a new one.

