Step by step
- Open the mailing in the
 Editing workflow step.
 - Click the position in your mailing where you would like to insert the personalised text.
- Click the
 Insert recipient data for personalisation button.
 - You may select the Activate Field dialog check box in the drop-down list. Then select the recipient table column containing the relevant texts for the recipients (for example, to insert the first names of the recipients, select the recipient table column that contains the recipients' first names).
-
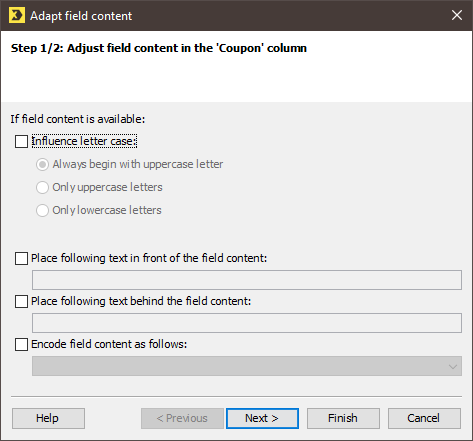
If you selected the Activate Field dialog check box in the drop-down list, a dialog box appears.
- In the dialog box, you can specify whether Inxmail Professional should automatically transfer the text read out of the selected recipient table column one-to-one into the field, or whether it should adapt it (for example, change the text to upper or lower case).
- Click Next.
- You can specify in the dialog box what should happen if no text is available for a recipient in the selected recipient table column. Inxmail Professional could then, for example, either not insert a text into the field, insert a particular predefined text into the field or exclude the recipient from the sending of the mailing.
-
Confirm the dialog box by clicking OK.
If you did not select the Activate Field dialog check box in the drop-down list, the field is immediately inserted into your mailing. In this case, if no text is later available for a recipient in the selected recipient table column, Inxmail Professional will not insert a text into the field.
The field is inserted into your mailing in the [<column name>] format (for example, [FirstName]).
If the column name contains special characters (for example, the column ‘2nd Account Number’), then the Column("<column name>") function is inserted for the field instead of the [<column name>] format.
- Save your entries.
- You have inserted a personalised text. The quick preview (
 (Show/hide quick preview) button) shows the personalised text for the recipient (or the test profile) currently selected in the
  Check workflow step using the Check content button.
Related topics
Inxmail Professional:
2 possible use cases
Depending on your contract, you might use Inxmail Professional in different ways:
-
As part of the Inxmail platform: You use newsletters & campaigns as your main tool for creating and sending newsletters. Inxmail Professional only serves as a recipient database and configuration tool in the background.
We are constantly expanding the functionality of “Newsletters & Campaigns”. Check out newsletters & campaigns section to find out if the feature you are looking for might already be available there.
-
Full scope: You use the legacy tool Inxmail Professional as your main tool for creating and sending newsletters.
Did you not find what you were looking for?
-
Send us your feedback.

