Step by step
Open the Manage list association dialog box as follows:
- Open a recipient table.
- Select the recipient you require in the recipient table.
-
Click the
 (Edit recipient) button and then select Manage list association.
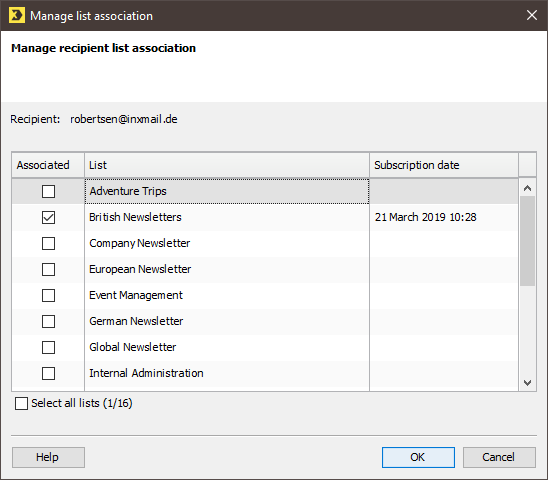
A window appears. -
The dialog box displays the list association of the first selected recipient. All the lists to which the recipient is currently subscribed are selected in the Associated column. In the Subscription date column (corresponds to the Subscription date <Name of the mailing list> system column), you can see the date on which this recipient subscribed to the respective mailing list.
To edit the list association of the recipient, proceed as follows:
- To subscribe the recipient to further mailing lists, select the check boxes for the required mailing lists in the Associated column.
- To unsubscribe the recipient from mailing lists, clear the check boxes for the respective mailing lists in the Associated column.
- Confirm your entries by clicking OK.
-
The dialog box now displays the list association of the next selected recipient.
In the dialog box, specify the list association for all the remaining recipients.
- Each recipient is now subscribed to the mailing lists that you have activated and/or unsubscribed from the mailing lists that you have deactivated.
Note: The value of the Tracking permission column is reset to the default value ![]() No for a new list association.
No for a new list association. ![]() No means: You do not have consent to person-based tracking for this recipient and the current list.
No means: You do not have consent to person-based tracking for this recipient and the current list.
Related topics
Inxmail Professional:
2 possible use cases
Depending on your contract, you might use Inxmail Professional in different ways:
-
As part of the Inxmail platform: You use newsletters & campaigns as your main tool for creating and sending newsletters. Inxmail Professional only serves as a recipient database and configuration tool in the background.
We are constantly expanding the functionality of “Newsletters & Campaigns”. Check out newsletters & campaigns section to find out if the feature you are looking for might already be available there.
-
Full scope: You use the legacy tool Inxmail Professional as your main tool for creating and sending newsletters.
Did you not find what you were looking for?
-
Send us your feedback.

